How to Build an MVP in 4 Weeks
A week-by-week plan for taking a startup idea from discovery to a live product in about a month, and the scope rules that make it possible.
Most MVP guides say "three to six months". That is a fair average for an MVP that has grown into a small product, but a lot of that time is scope creep rather than engineering. If you are willing to be strict about what goes in, a focused MVP can go from idea to live product in about a month.
This is the plan we follow at Srutved for tightly scoped builds: four weeks, four phases, and a short list of rules that keep the schedule honest. It will not fit every product, and the last section explains when to plan for longer.
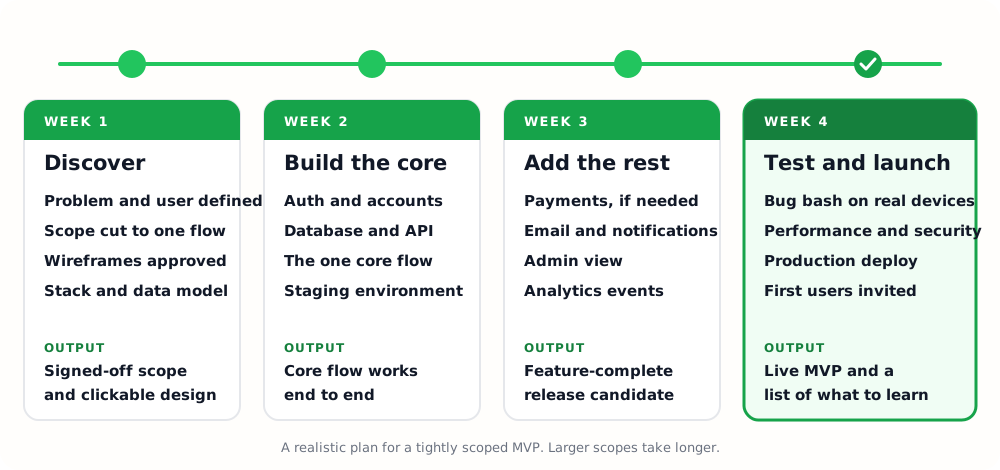
The four-week plan at a glance
Before day one: the scope rules
A four-week MVP is mostly decided before anyone writes code. These rules do more for your timeline than any tool.
- One user type, one problem. If your idea has a buyer, a seller and an admin, pick the one whose problem you are solving first. The others get the simplest possible version, or a manual process behind the scenes.
- One core flow. Write it as a sentence: "A user can do X and get Y." Everything in the build either serves that sentence or waits.
- Buy before you build. Use a service for authentication, payments, email and file storage. Your differentiation is not in your login screen.
- Fake it where it is safe. If an automated feature would take two weeks, ask whether a human doing it by hand for the first 20 customers would teach you the same thing. Often it will.
- One decision-maker. Reviews that wait on a committee are the most common cause of a slipping schedule.
Week 1: Discover and design
The goal this week is to turn an idea into a scope that can be built. Expect a few focused working sessions rather than a big document.
- Write down who the user is, what problem you solve for them, and how they solve it today.
- List every feature you can think of, then cut it down to the core flow. Our guide to prioritizing MVP features shows how.
- Sketch wireframes for each screen in the core flow and click through them, ideally with two or three people from your target audience.
- Choose the stack and sketch the data model. For most products a boring, well-supported stack is the right choice (see our MVP tech stack guide).
- Define the one or two metrics that will tell you whether the MVP is working.
You are done when the scope is written down, the designs are approved, and nobody is surprised by what is being built.
Week 2: Build the core
This is the heart of the project. Build the foundations and the single core flow, and nothing else.
- Set up the repository, environments and deployment pipeline on day one, so that every change can be seen on a staging URL.
- Implement sign-up and login with a managed service.
- Build the database and the API for the core flow, then connect the screens from week 1.
- Demo progress at least twice this week. Short feedback loops are what stop week 4 from becoming week 7.
You are done when a person can complete the core flow from start to finish on staging, even if it looks rough.
Week 3: Add the supporting features
With the core working, add what turns a demo into a product people can really use.
- Payments or subscriptions, if the first test is willingness to pay.
- Transactional emails and notifications (welcome, receipt, password reset).
- A minimal admin view so you can see users and fix data without touching the database.
- Analytics events for the metrics you chose in week 1. If you do not instrument the MVP, you will launch and learn nothing.
- Integrations you genuinely need on day one, and only those.
You are done when there is a release candidate with every must-have feature in place. New ideas now go onto the "after launch" list.
Week 4: Test, polish, launch
- Test on real phones and browsers, not just the machine it was built on.
- Check the unglamorous essentials: error messages, empty states, slow connections, password reset, and what happens when a payment fails.
- Review security basics: access control, input validation, secrets handling and backups.
- Deploy to production, set up error monitoring, and invite your first users in small batches.
- Hold a short retrospective and write the "what we want to learn" list for the first month of usage.
You are done when real users are using it and you can see what they do.
What makes the schedule slip
- Scope added mid-week. Keep a visible "after launch" list and put new ideas there without argument.
- Slow feedback. A design review that takes four days costs four days. Agree response times upfront.
- Unclear third-party access. API keys, app-store accounts, domain and payment approvals can take longer than the code. Start those requests in week 1.
- Compliance surprises. If you handle health, financial or children's data, you need to plan for it from the start.
When four weeks is not realistic
Be honest about the exceptions. Plan for longer, commonly eight weeks or more, when your MVP involves:
- Native apps on both iOS and Android with significant device features.
- Regulated domains such as healthcare, lending or payments, where compliance work is part of the product.
- Multiple user roles with complex permissions, or a two-sided marketplace that needs both sides to work on day one.
- Original machine-learning work, as opposed to using an existing AI model through an API (see how to build an AI MVP).
Many published guides put the typical MVP at roughly 8 to 16 weeks, with simple products at 4 to 6. The difference between a month and a quarter is almost always scope, not talent.
After launch
Launch is the start of the learning, not the end of the project. Check your two metrics weekly, talk to users who dropped off, and decide each fortnight whether to persevere, adjust or change direction. If you are still deciding what the build should cost, read MVP development cost in 2026.
Have an idea you want to take to market quickly? Talk to Srutved about a scoped, four-to-six-week MVP.
Tags
Keep reading